Let's see who needs this and what jobs can be brought.
Waking Dreams Start NPC: Kerutoto
 - Windurst Waters (J-8) South Map
Requirements: Windurst Reputation 4~ Chains of Promathia Chapter 4-1 or higher
Title: Heir to the Realm of Dreams
Reward: Ability to summon
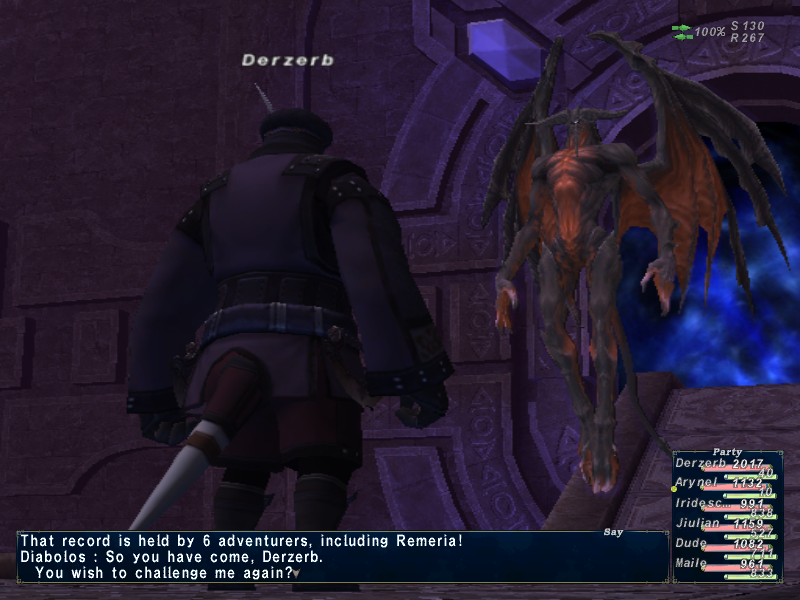
Diabolos or
Diabolos's Pole or
Diabolos's Earring or
Diabolos's Ring or
Diabolos's Torque or
15,000 GilWalkthrough * Go to South Windurst Waters and speak to Kerutoto in the Rhinostery's North wing. She will explain that Diabolos is interfering with her meditation and says that he's waiting for you at The Shrouded Maw. She will give you the Key Item Vial of Dream Incense, which will allow you entry into the battlefield for this quest.
* Enter the tower at (H-8) in Beaucedine Glacier. You will need sneak and invis through some of the areas and not through others. In this Pso'Xja tower, there are shimmering walls of different color. Every time you enter one you zone and all your buffs wear off. The order of walls you want is red, black, red, black. After the last black zone, sneak up and ride the elevator down.
* Enter The Shrouded Maw (via Pso'Xja through the Level 40-capped tower, similar to Chains of Promathia Chapter 3-5). Select the battlefield entrance. The battle "Waking Dreams" will now be available. Select it when you are ready.
* Try to fight Diabolos on Lightsday and do not fight him on Darksday.
* Once you defeat him, you will acquire the Whisper of Dreams (key item).
* Return the Whisper of Dreams to Kerutoto for your reward.
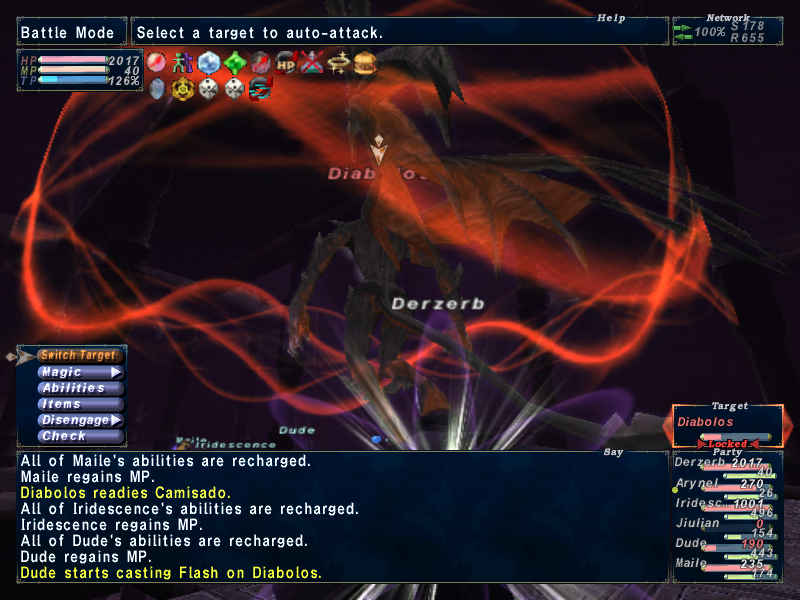
* Diabolos' TP attacks: * Nightmare: Inflicts anyone on the floor with Sleep and 21HP/tick Bio. Damage will not wake you up from Nightmare, only Cure and Benediction. (Benediction will also remove the Bio effect, which otherwise must be erased.) Nightmare can and should be interrupted with Stun, Head Butt or stun weaponskills such as Smash Axe. NOTE: Weapon Bash will NOT stun Nightmare! The Bard song Fowl Aubade, combined with Barsleepra, is pretty effective for helping people to wake up fast from Nightmare. NOTE: DRK/BLU is an advantage being a DD and stunner (Stun recast time is 45 seconds and Head Butt recast time is 10 seconds).
* Camisado: Single-target physical damage and knockback. Stand with your back to the wall so that this doesn't knock you into the pit below.
* Noctoshield: Gives Diabolos the effect of Phalanx (Dispel or Magic Finale).
* Ultimate Terror: AOE Absorb-All. Drains multiple attributes. Not too bad on its own, but it interferes with Dispelling Noctoshield and Erasing Nightmare Bio. Absorbed by Utsusemi.
Diabolos also casts various Dark elemental spells: Sleepga, Sleep II, Bio II, Drain, Aspir and Blind
General Notes * You will enter the battlefield facing Diabolos. Unlike the "Darkness Named" fight, this battle is uncapped. Everyone who is involved in the fight must have a Vial of Dream Incense.
* The maximum number of party members allowed to enter the battle is 6. There is a 30 minute time limit.
* You can buff up before entering the Memento Circle, so feel free to do so and rest up while still outside.
* Similar to the Chapter 3-5 fight, there are tiles on the battlefield that will drop away in the same order as the original fight. Falling down to the level below will most likely result in death from the numerous Diremite-type mobs.
* Diabolos has 9000 HP.
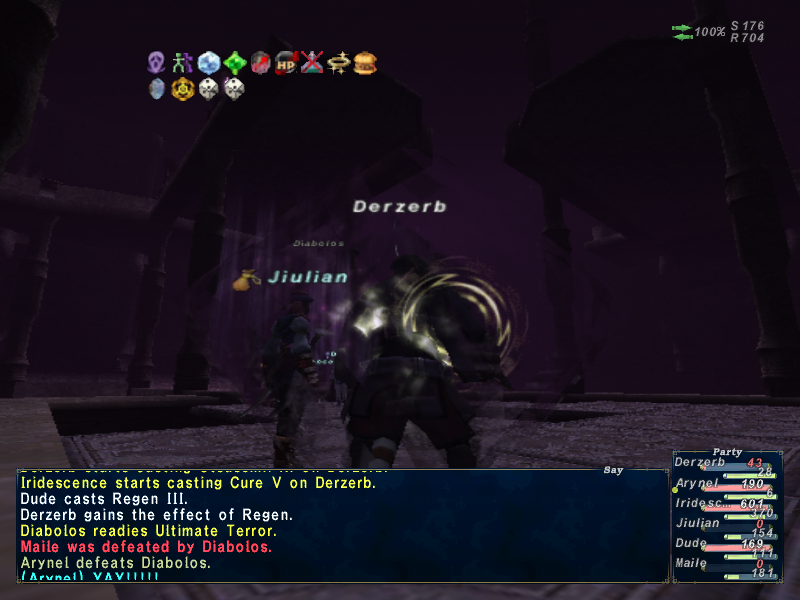
* Diabolos will Draw In the entire party when a party member aggros him. Prior to an update, a popular strategy was to have the tank disband from party, and drop down and aggro Diabolos, and then be re-invited after Diabolos does his Draw In move. This allowed party members to stay up top and heal and deal damage with no risk of being put to sleep by Nightmare. However, if someone from above pulls sufficient hate, then Diabolos will proceed to Draw In everybody anyway. This will only work for individuals who do not wish to be drawn-in to remain in the cutscene until Diabolos uses Draw In. Afterwards he'll only use it again if someone pulls hate from the upper floor. Attempting this, however, isn't really worth the risk. Diabolos can be defeated with an adequately balanced and prepared party.
* A "Chainstun" strategy (using a 75 RDM/DRK to constantly Stun Diabolos with Chainspell, while damage dealers take him down as quickly as possible) is known to work for this fight.
o Samurai are very good damage dealers for this fight, being able to deliver four or five weapon skills in quick succession with use of Meikyo Shisui and Meditate (Tachi: Gekko deals 500-900 damage to Diabolos from a well-equipped Samurai).
o Black Mages are desirable as well. To start the fight, one strategy is to have one Black Mage stand on the ledge and cast a strong Elemental Sealed -ga III spell, or Ancient Magic II, with no risk of being interrupted by Nightmare. This may be tricky to have multiple BLMs simultaneously start with, as Draw In will interrupt any spells past the first cast. This will take a large portion of Diabolos' health, but may lead to the Black Mage's death.
* Due to the patch where NMs will gain magic resistance if continuously hit by the same elemental type of spell, Diabolos may resist Stuns after the 4th or 5th volley. Employing the Chainstun strategy may be effective but is now risky because once Diabolos resists the Stun and Nightmare pushes through, there's a big chance of wiping. Because of this, you may opt to bring a DRK or BLM instead of RDM/DRK, or instruct your stunner to Stun only if Diabolos starts casting Nightmare. Casting Barsleepra before the fight is observed to reduce sleeptime if you're hit by Nightmare, giving the WHM a better chance to cast Erase to remove the Bio and Curaga to wake everyone up.
* Poison Potions are recommended, especially for any stunners and healers, as Diabolos will use Sleepga II.
* Diabolos will use Nightmare very regularly starting at 50% HP, and is also capable of using Ruinous Omen.
* Diabolos can use Dispelga very early on in the battle, removing two or more status effects, including Reraise. Adding multiple status effects to the party beforehand will reduce the impact of this.
* This quest is repeatable as often as desired.
* Each time you complete the quest, you can choose one reward from the list. Excluding the 15,000 Gil, you cannot receive the same item twice.
* Choose tiles to stand on that won't drop, preferably with the mages outside Nightmare range. If you just want to go with tiles that will never drop in any layout, here's where to stand during battle:
X - Tiles that may drop
O - Tiles that will not drop
X X
D X X
O X X
O O - Melee on
"OO" to the right or on "D" where Diabolos stands
X X X X X
X O X X X
X X
O O X - Mages on
"OO"Link: http://wiki.ffxiclopedia.org/wiki/Waking_Dreams